Disaster Recovery Workflow Using Snapmirror SVM
SnapMirror SVM Setup
Preparing the SVM for disaster recovery involves preparing the destination cluster, creating the destination SVM, creating the SVM peer relationship, creating a SnapMirror relationship, initializing the destination SVM, configuring the destination SVM for data access, and monitoring the SnapMirror relationship status. In this setup, cluster peering and SVM peering has been already done. The following steps demonstrate how to setup SnapMirror SVM Replication on the source and destination SVM using OnCommand System Manager: -
- Set up peering between the Source and Destination Cluster and SVM. For more information on how to set up a cluster peer, refer the following documentation.
- Create appropriate protection policy using OnCommand System manager UI “Protection Policy” page and choose the appropriate “Policy Type” and the “Transfer Priority”.
- Create schedules using System manager UI “Schedules” page and choose the appropriate schedule.
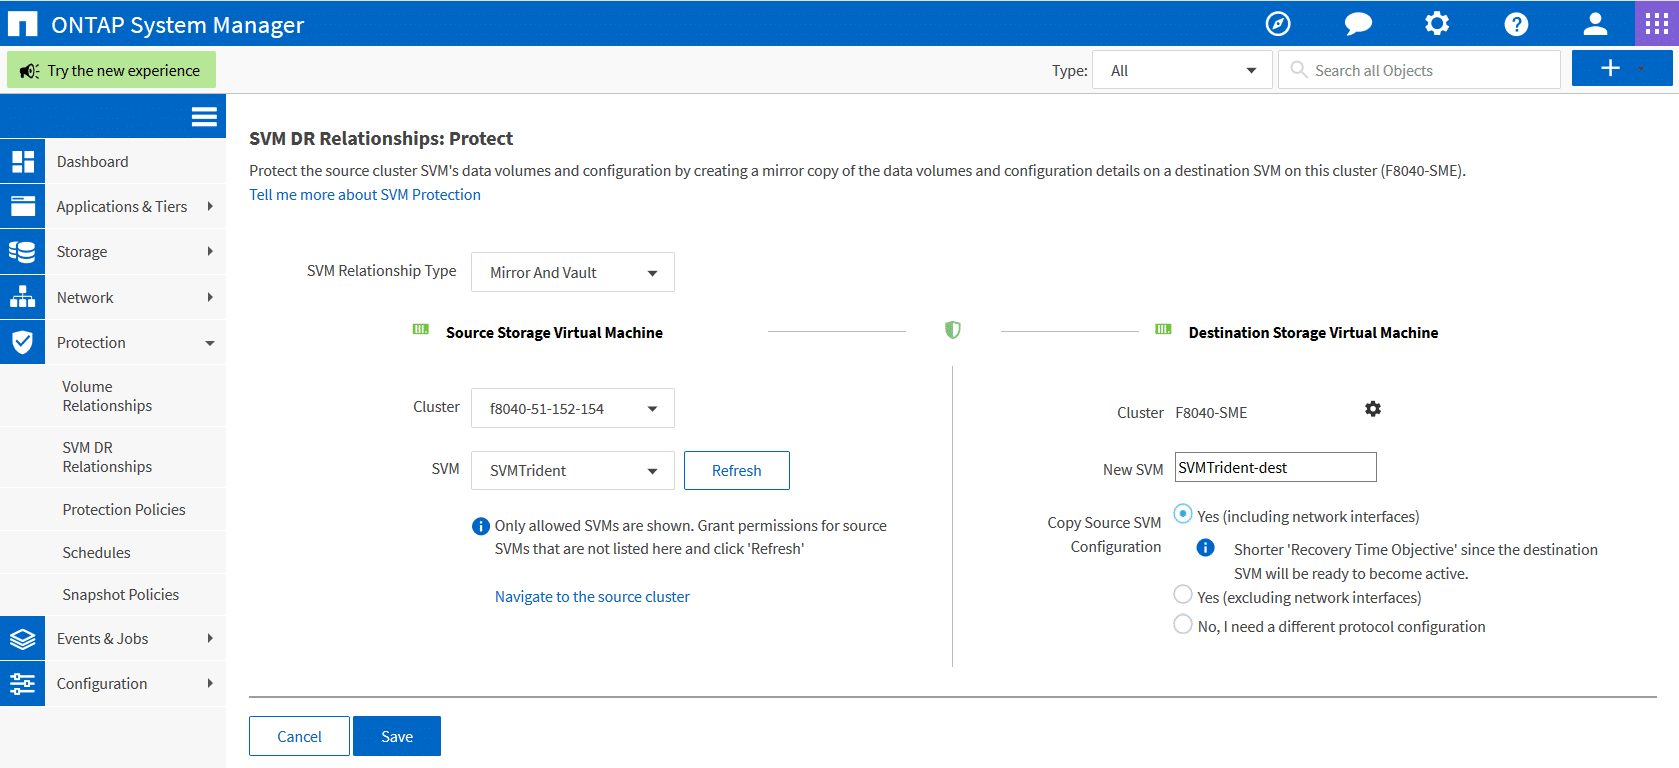
- To setup a SnapMirror SVM-DR relationship between the destination and source, use the OnCommand System Manager SVM-DR Relationship wizard. Make sure to create a relationship from the destination side.

- Choose the appropriate SVM Relationship type. You can choose “Mirror” or “Mirror and Vault”.
- Choose the appropriate Source cluster and Source SVM. If the source SVM is not listed in the drop-down box, grant permissions for source SVMs and click 'Refresh'.
- Give in a new name for destination SVM and click on the option to copy source SVM configuration which includes the network interfaces as well. By doing so an SVM of the type “dp-destination” and the SnapMirror SVM replication with the option “identity-preserve true” will be created.
- Click on the gear icon to set up the appropriate “protection policy” and “protection schedule”. Make sure to click on “Initialize Protection” to start the initialization process.

5. Click on “Save” to create the ONTAP Snapmirror SVM relationship. As you can see the relationship has been created and initialized. Please note that OnCommand System Manager will automatically assign all the aggregates to the new SVM created on the destination side.

6. Make sure that Trident volume and the other application volumes reside on SVMs that have Snapmirror SVM replication enabled on to the secondary cluster.
SnapMirror SVM Disaster Recovery Workflow for Trident v19.04 and Below

In this scenario, Trident volume is set up on the SVM that has Snapmirror SVM DR relationship with the destination SVM in the secondary site. The following steps describe how Trident and other applications can resume functioning during a catastrophe from the secondary site (SnapMirror destination) using the SnapMirror SVM replication.
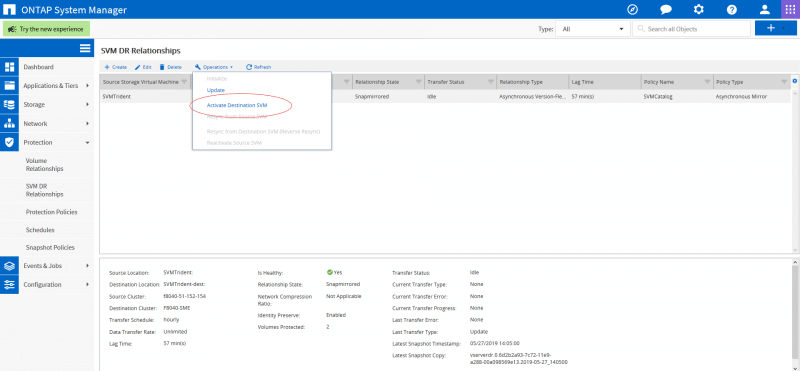
- In the event of the source SVM failure, activate the SnapMirror destination SVM from the System Manager UI “SVM DR Relationship” page.

- Activating the destination SVM automatically involves stopping scheduled SnapMirror transfers, aborting ongoing SnapMirror transfers, breaking the replication relationship, stopping the source SVM, and starting the destination SVM.
- All the volumes provisioned by Trident will start serving data as soon as the SVM-DR is activated.
- Please note that the SVM name will be different on the destination cluster and if the id-preserve parameter is kept as true, the network interface of the SVM will remain the same.
- Make sure to update all the required backends to reflect the new destination SVM name using the "./tridentctl update backend <backend-name> -f <backend-json-file> -n <namespace>" command.
- All containerized applications should be running without any disruptions.
If the disaster recovery operation should involve setting up a new Kubernetes cluster on the destination side,then the recovery steps should be as follows.
- Make sure that the Kubernetes objects are backed up using a backup utility tool.
- Install Trident on the Kubernetes cluster using the Trident volume at the destination site using the "./tridentctl install -n <namespace> --volume-name <volume-name>" command
- Once Trident is up and running, update all the required backends to reflect the new destination SVM name using the "./tridentctl update backend <backend-name> -f <backend-json-file> -n <namespace>" command.
- Create new Storage Classes to point to the newly created backends.
- Import all the application volumes from the destination SVM into the Kubernetes cluster as PVs bound to a PVC using the "tridentctl import volume" command.
- After all the PVs are imported ,deploy the application deployment files to restart the containerized applications on the clusters.
SnapMirror SVM Disaster Recovery Workflow for Trident v19.07 and above
Trident v19.07 and beyond will now utilize Kubernetes CRDs to store and manage its own state. It will use the Kubernetes cluster’s etcd to store its metadata. Here we assume that the Kubernetes etcd data files and the certificates are stored on NetApp FlexVolume. This FlexVolume resides in a SVM which is mirrored to the secondary site using Snapmirror SVM technology.
- After activating the destination SVM, all the volumes that had been replicated will now start to serve data. The interfaces of the SVMs will remain the same.
- All the data volumes provisioned by Trident will start serving data as soon as the secondary SVMs are activated.
- Please note that the SVM name will be different on the destination cluster and the network interface of the SVMs will remain the same.
- Make sure to update all the required backends to reflect the new destination SVM name using the "./tridentctl update backend <backend-name> -f <backend-json-file> -n <namespace>" command.
- All containerized applications should be running without any disruptions.
If the disaster recovery operation should involve setting up a new Kubernetes cluster on the destination side,then the recovery steps should be as follows.
- Mount the volume from the secondary site which contains the Kubernetes etcd data files and certificates on to the host which will be set up as a master node.
- Copy all the required certificates pertaining to the Kubernetes cluster under /etc/Kubernetes/pki and the etcd member files under /var/lib/etcd.
- Now create a Kubernetes cluster with the "kubeadm init" command along with the "--ignore-preflight-errors=DirAvailable--var-lib-etcd" flag. Please note that the hostnames used for the Kubernetes nodes must the same as the source Kubernetes cluster.
- Update all the required backends to reflect the new destination SVM name using the "./tridentctl update backend <backend-name> -f <backend-json-file> -n <namespace>" command.
- Clean up all the application deployments,,PVCs and PVs on the cluster.
- Import all the application volumes from the destination SVM into the Kubernetes cluster as PVs bound to a PVC using the "tridentctl import volume" command.
- After all the PVs are imported ,redeploy the application deployment with the imported PVs to restart the containerized applications on the clusters.
We know you will have more questions about things which concern you, so please reach out to us on our Slack team, GitHub issues. We’re happy to help!. Please go through the remaining of the Trident Disaster Recovery blog series to understand how Trident DR can be done using different NetApp data replication technologies.

